

Unity support many kinds of rendering paths. For now there are three types of rendering path in Unity: forward, deferred, and vertex lit (almost never use) rendering path.
An example of setting rendering path
in Unity ShaderPass { Tags{ "LightMode" = "ForwardBase" } }
The Below Table shows the
CommonRendering Path Option for LightMode Tag in Unity Shader
| Tag Name | Description | |
|---|---|---|
| Always | This Pass will be rendered in any rendering path, but it will not calculate any lighting | |
| ForwardBase | Used for forward rendering. The Pass will calculate the environmetal light, directional light, per-vertex /Spherical Harmonics(SH) light source, and Lightmaps | |
| ForwardAdd | Used for forward rendering. The Pass will calculate additional per-pixel light source, every Pass corresponding one light source | |
| Deferred | Used for deferred rendering. This Pass will render G-Buffer(includes color, normal, Buffer in world space) | |
| ShadowCaster | Render the object’s depth info into the shaowmap or a depth map |
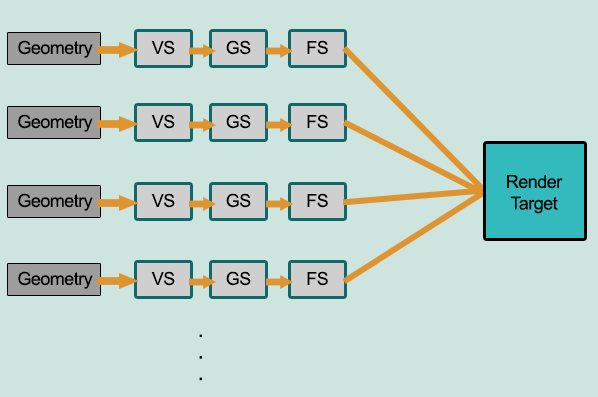
For each forward rendering, we need to render the rendering primitive of the object and calculate the data of two buffers (color buffer and depth buffer). We use the depth buffer to determine if a fragment is visible and update the color value of the color buffer if it is visible.
Pseudo code:
Pass
{
    for(each primitive in this model)
    {
        for(each fragment covered by this primitive)
        {
            if(failed in depth test)
            {
                discard;
            }
            else
            {
                float4 color = Shading(materialInfo, pos, normal, lightDir, viewDir);

                WriteFrameBuffer(fragment, color);
            }
        }
    }
}
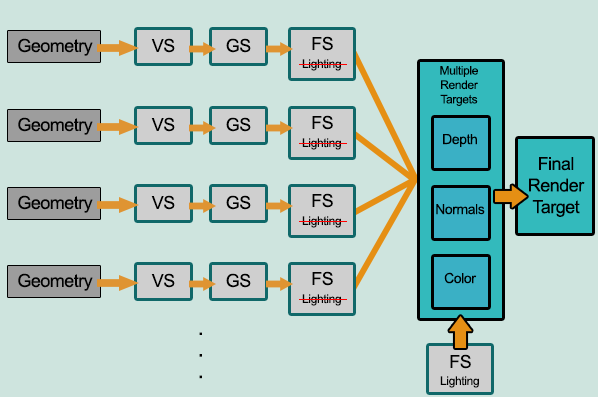
Deferred Rendering mainly includes two Pass. The first Pass, we don’t do any lighting calculations, and only calculate which fragment in the screen is visible through depth buffer. After finding a fragment is visible, it will store the data into the G-Buffer. Then, in the second Pass, it will use the data of fragment in the G-Buffer to do the lighting calculation.
Pseudo code:
PassOne // Store fragment data into G-Buffer
{
    for(each primitive in this model)
    {
        for(each fragment covered by this primitive)
        {
            if(failed in depth test)
            {
                discard;
            }
            else
            {
                WriteGBuffer(materialInfo, pos, normal, lightDir, viewDir);
            }
        }
    }
}
PassTwo // Calcaulate Lighting by using the data in G-Buffer
{
    for(each pixel in the screen)
    {
        if(the pixel is valid)
        {
            readGBuffer(pixel, materialInfo, pos, normal, lightDir, viewDir);
            float4 color = Shading(materialInfo, pos, normal, lightDir, viewDir);
            WriteFrameBuffer(pixel, color);
        }
    }
}
Normally we will use
Forward Rendering, but when the scene hastoo many light sources, theperformanceof Forward Renderingdropsdramatically.
For example, if we place multiple light sources in an area in the Unity Scene, and these light source areas overlap and influence with each other. In order to get the final lighting effects, we need to perform multiple Pass for each object in the area to calculate the lighting result of different light source to this object, finally, blend these results in the color buffer to get the final lighting. Therefore, every time when we call a Pass we need to render the object again, but many calculations actually is repeat.
Deferred Rendering can solve this problem because it
not onlyusescolor buffer, anddepth buffer, it also use an additional buffer calledG-Buffer(Geometry- Buffer). G-Bufferstoresthe information of the surface we care (normally it means the surface which is the closest to camera), such as the surface’s Normal, Position, Material Properties used for illumination calculation, etc.
End –Cheng Gu